
Step-by-step Tiny Toes Baby Socks pattern for knitting perfect baby socks – guaranteed to stay on tiny feet.
Updated! 6-18month size is now available, you can find it here


Here’s why you’ll want to knit these:
- Each pair takes only a few hours to finish, it’s a perfect last-minute baby gift.
- Use up leftover stash yarn
- This special design keeps little feet covered and warm, these stay on better than standard socks.
- Improve your sock skills. A great intro if you’ve never knit a sock, or a wonderful little project to explore tips & tricks that will make your full-size human socks even better.

What you need before you begin:
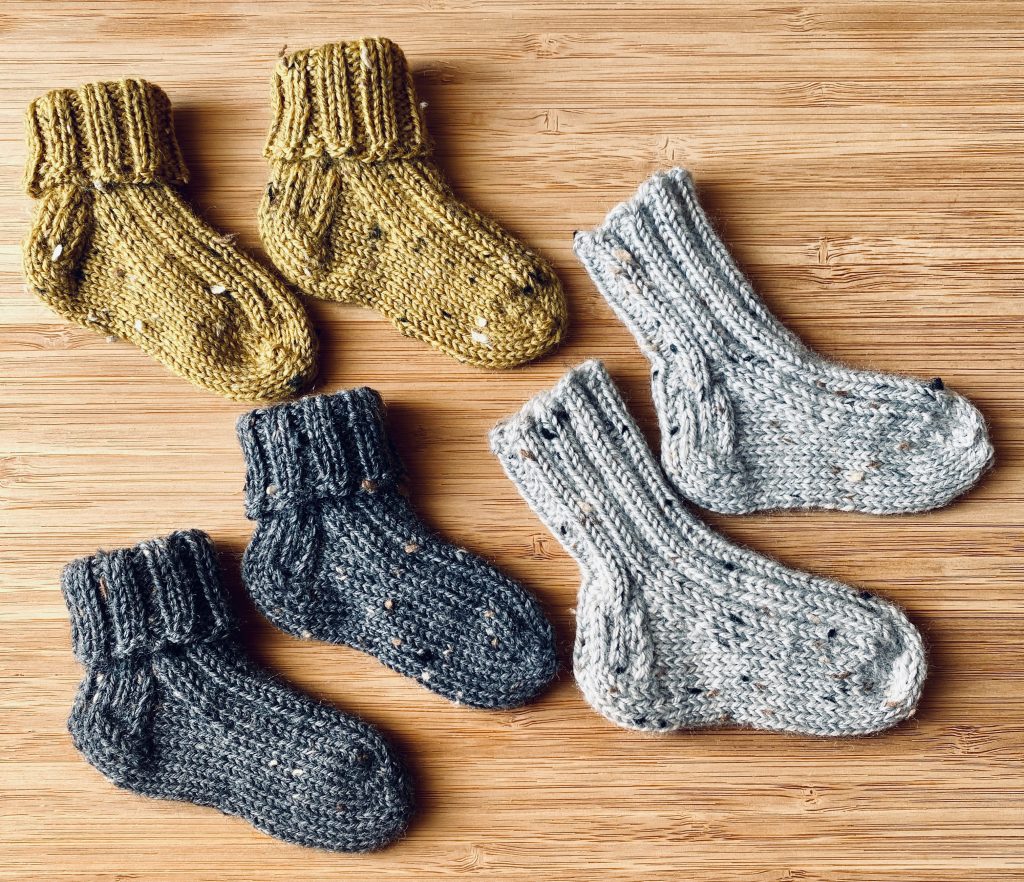
- 12-15g Fingering-weight yarn. New parents want easy-care fabrics, so make sure the yarn is washable. My favorite is a superwash wool blend. Most importantly, it should be super soft for tiny feet. -Pictured socks were knit with KnitPicks Stroll Tweed
- 2.25mm / US 1 needles. I knit socks using 32″ (80cm) long circulars and MagicLoop technique.
- 2 small stitch markers.
- 1 tapestry needle.
Excited to start yet? I am! I love knitting socks of all sizes, I’ve always got at least 1 pair on the needles. So now that you’ve got everything together, let’s get to the knitting…
STEP 1 – Casting On
We want the top of these tiny socks to be extra stretchy so the socks are easy to put on and have enough stretch to wear tall or cuffed.
Cast on 32 stitches with a stretchy long-tail method. I use the Old Norwegian (aka Twisted German) cast on and have never had an issue with it.
STEP 2 – Join to Work in the Round
Split the 32 stitches evenly between the needles, 16 on the front needle, 16 on the back. To join the round seamlessly:
- Hold the needles in you right hand, tips pointed to the left and the tail/working yarn on the needle closest to you (front needle).
- With the working yarn, cast on 1 more stitch on the back needle (next to the 1st stitch you cast on).
- Move the needles to your left hand and knit the first 2 stitches together. That is your 1st stitch and your join.
- Give the tails a gentle tug now and before the next few rounds to make sure it’s snug.
STEP 3 – Knit the Leg
Each round (and needle) is: K1, *P2, K2*, P2, K1 – repeat instructions between * *
(1st round: when you joined the round, you worked the 1st stitch, so after the K2tog join, you’ll start with the P2…)
Work 24 rounds for the leg.
STEP 4 – Make a Heel
For the heel, you’ll be working only the stitches on the back needle, the front stitches rest on the cable for now.
Row 1: Slip 1 stitch as if to purl, then purl to the end of the needle. Turn your work.
Row 2: Slip 1 stitch as if to knit, then *K1, SL1* to the last stitch and K1. Turn your work.
Repeat rows 1 & 2 a total of 6 times (12 total rows), then work 1 more row 1.
(Note: in Row 2, only the 1st stitch is slipped as if to knit, all other slip stitches are as if to purl – this method makes for a neater edge when working the gusset)
STEP 5 – Heel Turn
Row 1: Knit across until the last 5 stitches on the left needle. SSK {slip 2 stitches (one at a time) as if to knit, then knit those 2 stitches together from the right needle}. Turn your work.
Row 2: Slip 1 stitch as if to purl, then purl until only 5 stitches are left on the left needle. P2tog {Purl 2 stitches together}. Turn your work.
Row 3: SL1, K6, SSK and turn. (you are closing the gap from where you turned)
Row 4: SL1, P6, P2tog and turn.
Continue working Rows 3 & 4 until you only have 8 stitches left. Finish with knitting across the last row.
STEP 6 – Gusset Pickup
Pick up 9 stitches along the edge of the heel flap. 7 stitches from the slipped stitch edge and 2 more to close the gap where it meets the front-resting stitches. Place a stitch marker
Knit across the front stitches using the pattern from before: K1, *P2, K2,* K1. Place a stitch marker
Pick up 9 stitches along the other edge of the heel flap in the same way.
Tip: after knitting across the front, pick up 1 stitch then slide it to the left needle and place the marker, then add the stitch back. It’s easier than trying to pick up the first stitch with a marker in the way.
Knit 4 of the heel stitches. This is the middle of the heel and your temporary beginning/end of round. Reorganize your stitches on the 2 needles to be equal. Split in the middle of the heel & in the middle of the front. (that’s why we put markers on each side of the front stitches, so you can tell front/back stitches vs front/back needles – it’s just for these few rounds)
STEP 7 – Gusset Decreases
Setup Round: K4 heel stitches, K7 picked up stitches through the back loop {slide your needle behind the stitch instead of from the front and knit}, K2 that close the gap -slip marker- Knit front in pattern, -slip marker- K2, K7 through the back loop, K4.
Decrease Round: Knit until 3 stitches before marker, K2tog, K1, knit front pattern, K1, SSK, Knit to end.
Knit Round: Knit to marker, knit front pattern, knit to end.
Repeat Decrease & Knit rounds until there are 8 stitches before and after the marker. (back to the original stitch number, 16 each needle, 32 total)
STEP 8 – Foot
Reorganize the stitches so the front pattern is on the front needle and the heel is on the back needle. 16 stitches per needle. Remove the markers at this point.
Knit pattern K1, *P2, K2*, K1 on the front needle, and knit all stitches on the back needle.
Repeat for 14 rounds.
STEP 9 – Toe
Setup round: Knit 1 round, front & back needles.
Toe Decreases: SSK, Knit to last 2 stitches, K2tog – do this on both needles.
Repeat the toe decreases until there are only 8 stitches on each needle (16 total).
STEP 10 – Finishing
Cut your yarn leaving an 8-10″ tail. Thread onto tapestry needle.
Use Kitchener Stitch to close the toe neatly.
Weave in all ends.
Knit another…and another…and another!
You’ll find these a bit addictive, they are so quick and fun and absolutely adorable when complete. I bet you’ll be sorting through your yarn stash to make more and more. Whether you have a baby due to arrive in your life or not, a stash of these are great to have on hand for gifting when the moment comes. They also make a very sweet bunting… I’m thinking Christmas colors, maybe a string of them in your craftroom or above the laundry, the possibilities are limitless! Have some fun, keep calm and knit on!
If you’re looking for more baby knits… take a look at the Nap Time Onesie
Are those tiny feet growing out of the newborn size? Knit the next size up – click here for the pattern
Share with the community
I’d love to see what you make, click my Instagram link below or post your Tiny Toes Baby Socks on my Ravelry page. It’s fun and inspiring for everyone when we share what we create!
Beautiful color choices but most of all – thank you for a wonderful pattern!
You are very welcome! I hope you enjoy the knit!
Thank you for the beautiful baby knit sock pattern! I’m looking forward to making them! They will make the cutest gifts!
These are darling and so easy to knit! How could I make them bigger for growing baby feet?
Hi Kelsey – so glad you’re having fun making these! Great question about sizing them for growing feet.
Adding more stitches to your cast-on will increase the width. Then add more rows to the length to the leg and foot for a custom fit. For the Tiny Toes ribbed style, you need to add stitches in increments of 8. Working the heel will change just a bit… but, I have an easy way to work out the “math” for sock sizes that will help a lot.
I will write up a post on my basic “sock math” that will help you make socks for any size of tiny human feet!
Hi Kelsey! This is my first time knitting socks, and I was hoping you could clarify the heel turn for me. When you say to knit rows 1 and 2 a total of 12 times – is that 12x per row, or 12x back and forth?
Thank you!
So sorry, I meant to say hi LisaMarie but my brain typed Kelsey because that’s the name I was looking at while I typed! Oops!
So glad you’re knitting some socks!
For the heel turn, you will want to knit 12 total rows, so if you count down-and-back as 1 row, you will repeat that 6 times. Basically row 1 counts as 1, and row 2 counts as 2…
Its way easier for me to just count down-and-back 6 times too, but whichever is easiest for you! 12 rows, not 24! 😊
Let me know if you have any other questions, I hope they turn out great!
Hi – I’m knitting a sock right now. First sock I’ve ever made. I’m at the heel. So I knit row 1 and row 2. Then the directions say to repeat 1&2 6 times (12 total rows) do you mean you will have knit 12 total rows for the heel or are you saying repeat 12 total rows (14 rows including the first 2? I’m thrown off by the word “repeat.” Thank you for clarifying!
Hi – I’m knitting a sock right now. First sock I’ve ever made. I’m at the heel. So I knit row 1 and row 2. Then the directions say to repeat 1&2 6 times (12 total rows) do you mean you will have knit 12 total rows for the heel or are you saying repeat 12 total rows (14 rows including the first 2? I’m thrown off by the word “repeat.” Thank you for clarifying!
Hi Jan, welcome to sock knitting! Work 12 total rows for the heel flap. If you have worked rows 1 & 2 once already, work those two rows 5 more times.
Hope that helps.
Yes! Thank you so much. Sweetest littLe sock pattern. Can’t wait to to gift these!
Thank you for the pattern but I can’t locate a stitch/row gauge so I can’t really use it. Can you please supply this for the yarn and needle you used? Thank you very much.
Hi Loretta,
Gauge is 8-8.5 stitches & 11-12 rows for 1” (2.5cm)
I use 2.25mm or 2.5mm needles and any sock yarn.
If your gauge is less than 8 stitches per inch, that’s ok. You’ll just have a slightly looser, stretchy sock.
If your gauge is more than 8.5 sts per inch, use a larger needle to make sure the sock isn’t difficult to put on!
Thanks for asking, I hope this helps – Happy Knitting!
LisaMarie
Thank you very much. Very helpful in order to use the yarn I have.
Hi Lisa,
Is this gauge in stocking knit stitch? I matched the gauge with a US 3 needle and started on the socks but they seem so tiny! Maybe I just don’t understand how tiny newborn feet are?
Hi Gabrielle,
Yes the gauge is measured in stockinette. Newborn feet are very tiny, but they do grow fast. If you’re using a US 3 needle, the socks will be a bit bigger but will still fit during the ‘newborn’ phase.
Hi,
Can you clarify the heel turn? Row 1, I knit until 5 stitches are left. And then SSK. It’s not clear to me, should I SSK the rest of the stitches? If I SSK twice, I’m left with one stitch on the needle. What do I do with it?
Thanks! The socks are looking adorable, and speaking as someone who has never knit socks before, this has been way easier than I thought!
Maile
Hi Maile,
Just SSK 1 time (leaving 3 stitches). Turn your work and continue from there. You will SSK and P2tog over a gap each time you turn after the two set up rows, so each time you turn there are 1 fewer stitches remaining at the end until they are all used.
This is the heel turn part! You are making a narrow point for the back of the heel.
I’m so glad you are trying sock knitting! Its so fun. Let me know if you need any more help along the way 😊
I started knitting my little socks on DPN’s and faced with many troubles on the way. At the step 4 I figured out that the right side of the heel is at the wrong side 😩
Anyway, it’s a good chance to practice knitting socks. And this ones has to be my first FINISHED socks in my life.
I can’t figure out the number of heel sts to have. It says back sts. To me thats 14 sts on one needle of the 3. I am using dpn
Hi Margaret!
I knit mine using MagicLoop, so my stitches are split on only 2 needles.
You can rearrange your stitches to have the “back” 16 sts on one needle to work the heel flap. Slip 2 sts from the 2nd needle onto your 3rd needle temporarily while you work the heel flap and turn.
The heel is worked on the 2nd half of the total stitch count. Stitches 17-32 if counting from the beginning of the round.
Hope this helps! Happy knitting!
Hi! Thanks for this pattern! I am frénétique and it’s the first time that I knit using english words!
I am doing the heel, I’m at the end of the fourth step.I did the rows 1 and 2 six times.
It s indicated to do one more row.
This last row refers to the 1st one?
In this case, I feel a bit lost for the 5th step.
Thank you for helping me !
I am french* (sorry)
Hi Maitane!
Knit all of the heel stitches. Then you will be in the correct place to start picking up stitches at the side of the heel flap (step 6).
Hope this helps!
Enjoying trying these for the first time. Question about the gusset pickup: you say to pick up 7 from the slipped stitch edge “plus 2 more”. Where do these 2 more come from?
I’m not there yet, so it may be obvious when I get to that step. But I’ll be there soon and am thinking ahead.
It should make sense when you get there. You pick up 2 more stitches below the slipped stitch edge. Look for the “V” of a stitch and make sure to pick up a stitch under 2 strands (both sides of a stitch).
If you run into trouble, please let me know and I will try and capture some photos to help!
Just as info, I recommend picking up the 2 extra stitches to prevent a hole at the join of the heel to the front of the sock, and it gives just a little more stretch around the ankle.
hi, lisa – just got finished copying all of your very helpful tips – thanks! i’m going to try out a sock pattern or two of yours on ravelry, and would like to know about what shoe size (please not foot circumference, as the socks are going to be gifts for people that i don’t know) will fit your adult sm, med, and large. i’m hoping for women’s size 7 and 9 and men’s size 10 and 11 specifically. thank you so much!
Hi Jane!
I wear size 7 shoes and the medium size sock fits me very well. I also make the Medium size for family that wear women’s 9-10. Just make the foot portion a bit longer but the medium (64 stitches) is a good choice.
For men’s socks, I usually knit the large size (72 stitches) mostly because many men tend to have a thicker ankle to pull the sock over.
I hope that helps! Please let me know if you have other questions!
🧦❤️ happy knitting ~Lisa
hi again, lisa – my, but you’re a fast responder! i’m a long-time fingering wt sock knitter, but i’m going to buy your dk and worsted wt sock patterns, because mine that i’ve guessed at just aren’t right. so…
1) i guess the medium for 7-10 women’s and large for 10-11 men’s apply to your dk and worsted socks as well?
2) i don’t want you to expose your patterns here, but can you tell me maybe in a private email or something how long total the feet are for the sizes that i’m looking for? i’m really hopeless…
i’m off to buy your dk and worsted socks right now, so that you’ll know i’m not just being nosy! thanks again!
I sent you an email!
I could not find a listing of abbreviations.
Hi Lisa!
Thanks for the very cute pattern. It’s my first time knitting a sock with MagicLoop—wow what a great first start! Can’t wait to put them on my newborn coming in November 🙂
Just wondering, for some reason the pattern in front of the sock alternated differently during the Gusset Pickup/after doing the heel. (i.e. the ribbed pattern changed) by any chance you have encountered this yourself? Thanks so much!! Any insight would help 🙂
Hi, just wanted to say that you for this pattern, you really have made it so simple to follow and this is definitely my go to pattern now (was recommended in a sock knitting group btw)
Could you increase these to make for adults ?
Hi! This is my first time knitting socks and so far so good!!
I’m a little confused on the step 6 gusset pickup part- by any chance do you have photos or videos explaining this step?
I have been reading and re reading the instructions and comments and can’t seem to figure out the picking up of stitches. Any advice would be really appreciated!
Awaiting our little one any day now and it’s been fun to have this little project to work on and I’m excited to use them for our baby:)